12 KiB
Building Ship of Harkinian
Windows
Requires:
- At least 8GB of RAM (machines with 4GB have seen complier failures)
- Visual Studio 2022 Community Edition with the C++ feature set
- One of the Windows SDKs that comes with Visual Studio, for example the current Windows 10 version 10.0.19041.0
- The
MSVC v143 - VS 2022 C++ build toolscomponent of Visual Studio - Python 3 (can be installed manually or as part of Visual Studio)
- Git (can be installed manually or as part of Visual Studio)
- Cmake (can be installed via chocolatey or manually)
During installation, check the "Desktop development with C++" feature set:
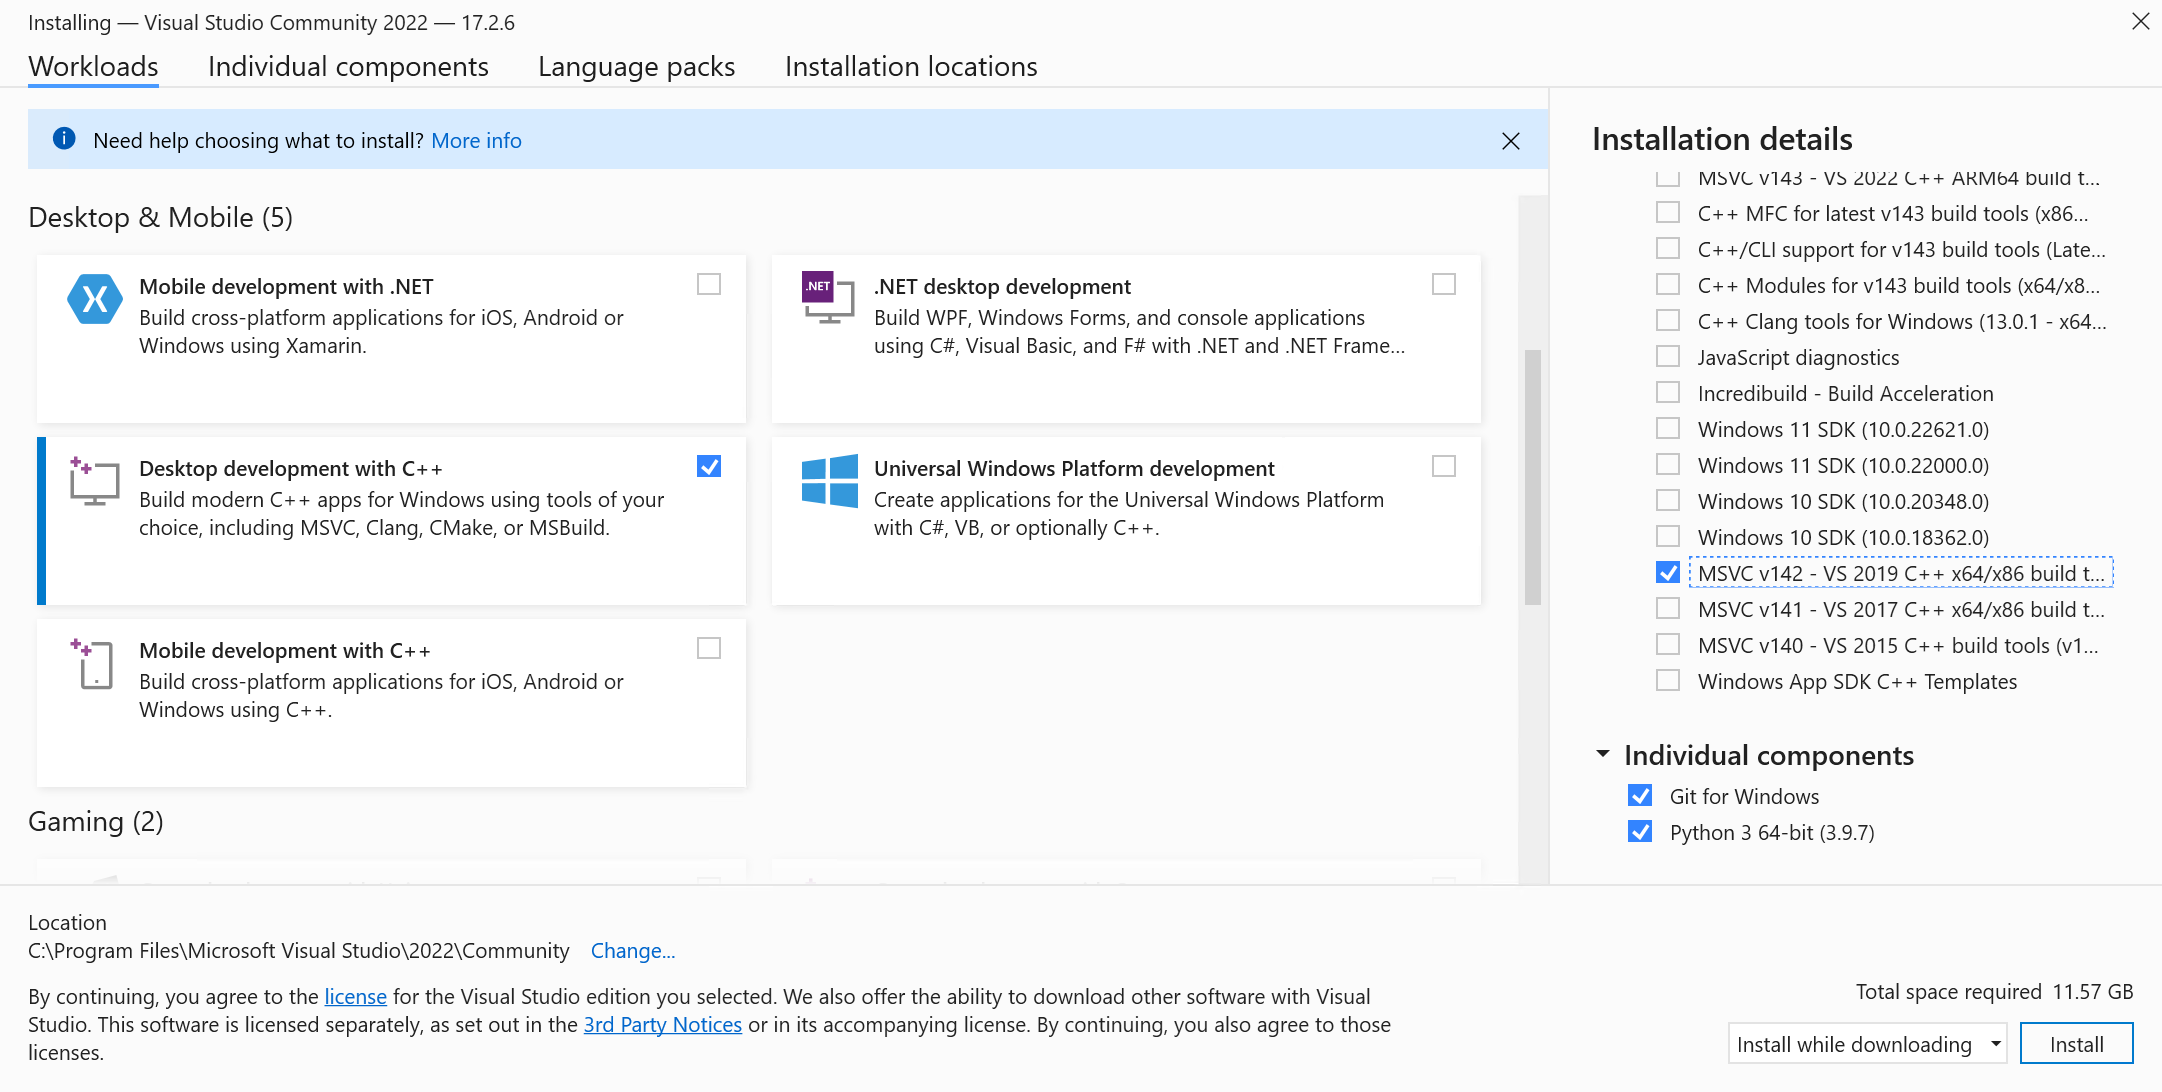 Doing so should also check one of the Windows SDKs by default. Then, in the installation details in the right-hand column, make sure you also check the v143 toolset. This is often done by default.
It is recommended that you install Python and Git standalone, the install process in VS Installer has given some issues in the past.
- Clone the Ship of Harkinian repository
Note: Be sure to either clone with the --recursive flag or do git submodule init after cloning to pull in the libultraship submodule!
- Place one or more compatible roms in the
OTRExporterdirectory with namings of your choice
Note: Instructions assume using powershell
# Navigate to the Shipwright repo within powershell. ie: cd "C:\yourpath\Shipwright"
cd Shipwright

# Setup cmake project
& 'C:\Program Files\CMake\bin\cmake' -S . -B "build/x64" -G "Visual Studio 17 2022" -T v143 -A x64 # -DCMAKE_BUILD_TYPE:STRING=Release (if you're packaging)
# Extract assets & generate OTR (run this anytime you need to regenerate OTR)
& 'C:\Program Files\CMake\bin\cmake.exe' --build .\build\x64 --target ExtractAssets # --config Release (if you're packaging)
# Compile project
& 'C:\Program Files\CMake\bin\cmake.exe' --build .\build\x64 # --config Release (if you're packaging)

# Now you can run the executable in .\build\x64

# If you need to clean the project you can run
& 'C:\Program Files\CMake\bin\cmake.exe' --build .\build\x64 --target clean

# If you need to regenerate the asset headers to check them into source
& 'C:\Program Files\CMake\bin\cmake.exe' --build .\build\x64 --target ExtractAssetHeaders

# If you need a newer soh.otr only
& 'C:\Program Files\CMake\bin\cmake.exe' --build .\build\x64 --target GenerateSohOtr
Developing SoH
With the cmake build system you have two options for working on the project:
Visual Studio
To develop using Visual Studio you only need to use cmake to generate the solution file:
# Generates Ship.sln at `build/x64` for Visual Studio 2022
& 'C:\Program Files\CMake\bin\cmake' -S . -B "build/x64" -G "Visual Studio 17 2022" -T v143 -A x64
Visual Studio Code or another editor
To develop using Visual Studio Code or another editor you only need to open the repository in it. To build you'll need to follow the instructions from the building section.
Note: If you're using Visual Studio Code, the cpack plugin makes it very easy to just press run and debug.
Experimental: You can also use another build system entirely rather than MSVC like Ninja for possibly better performance.
Generating the distributable
After compiling the project you can generate the distributable by running:
# Go to build folder
cd "build/x64"
# Generate
& 'C:\Program Files\CMake\bin\cpack.exe' -G ZIP
Linux
Install dependencies
Debian/Ubuntu
# using gcc
apt-get install gcc g++ git cmake ninja-build lsb-release libsdl2-dev libpng-dev libsdl2-net-dev libzip-dev zipcmp zipmerge ziptool nlohmann-json3-dev libtinyxml2-dev libspdlog-dev libboost-dev libopengl-dev

# or using clang
apt-get install clang git cmake ninja-build lsb-release libsdl2-dev libpng-dev libsdl2-net-dev libzip-dev zipcmp zipmerge ziptool nlohmann-json3-dev libtinyxml2-dev libspdlog-dev libboost-dev libopengl-dev
Arch
# using gcc
pacman -S gcc git cmake ninja lsb-release sdl2 libpng libzip nlohmann-json tinyxml2 spdlog sdl2_net boost

# or using clang
pacman -S clang git cmake ninja lsb-release sdl2 libpng libzip nlohmann-json tinyxml2 spdlog sdl2_net boost
Fedora
# using gcc
dnf install gcc gcc-c++ git cmake ninja-build lsb_release SDL2-devel libpng-devel libzip-devel libzip-tools nlohmann-json-devel tinyxml2-devel spdlog-devel boost-devel

# or using clang
dnf install clang git cmake ninja-build lsb_release SDL2-devel libpng-devel libzip-devel libzip-tools nlohmann-json-devel tinyxml2-devel spdlog-devel boost-devel
openSUSE
# using gcc
zypper in gcc gcc-c++ git cmake ninja SDL2-devel libpng16-devel libzip-devel libzip-tools nlohmann_json-devel tinyxml2-devel spdlog-devel

# or using clang
zypper in clang libstdc++-devel git cmake ninja SDL2-devel libpng16-devel libzip-devel libzip-tools nlohmann_json-devel tinyxml2-devel spdlog-devel
Build
Note: If you're using Visual Studio Code, the CMake Tools plugin makes it very easy to just press run and debug.
# Clone the repo and enter the directory
git clone https://github.com/HarbourMasters/Shipwright.git
cd Shipwright

# Clone the submodules
git submodule update --init

# Generate Ninja project
cmake -H. -Bbuild-cmake -GNinja # -DCMAKE_BUILD_TYPE:STRING=Release (if you're packaging) -DPython3_EXECUTABLE=$(which python3) (if you are using non-standard Python installations such as PyEnv)

# Generate soh.otr
cmake --build build-cmake --target GenerateSohOtr

# Compile the project
cmake --build build-cmake # --config Release (if you're packaging)

# Now you can run the executable in ./build-cmake/soh/soh.elf
# To develop the project open the repository in VSCode (or your preferred editor)
Generate a distributable
After compiling the project you can generate a distributable by running of the following:
# Go to build folder
cd build-cmake
# Generate
cpack -G DEB
cpack -G ZIP
cpack -G External (creates appimage)
Additional CMake Targets
Clean
# If you need to clean the project you can run
cmake --build build-cmake --target clean
Regenerate Asset Headers
# If you need to regenerate the asset headers to check them into source
cp <path to your ROM> OTRExporter
cmake --build build-cmake --target ExtractAssetHeaders
macOS
Requires Xcode (or xcode-tools) && sdl2, libpng, glew, ninja, cmake (can be installed via homebrew, macports, etc)
Important: For maximum performance make sure you have ninja build tools installed!
Note: If you're using Visual Studio Code, the cpack plugin makes it very easy to just press run and debug.
# Clone the repo
git clone https://github.com/HarbourMasters/Shipwright.git
cd ShipWright
# Clone the submodule libultraship
git submodule update --init
# Copy the baserom to the OTRExporter folder
cp <path to your ROM> OTRExporter
# Generate Ninja project
cmake -H. -Bbuild-cmake -GNinja # -DCMAKE_BUILD_TYPE:STRING=Release (if you're packaging)
# Extract assets & generate OTR (run this anytime you need to regenerate OTR)
cmake --build build-cmake --target ExtractAssets
# Compile the project
cmake --build build-cmake # --config Release (if you're packaging)

# Copy oot.otr into the Application Support directory
cp build-cmake/soh/oot.otr ~/Library/Application\ Support/com.shipofharkinian.soh/

# Now you can run the executable file:
./build-cmake/soh/soh-macos
# To develop the project open the repository in VSCode (or your preferred editor)

# If you need to clean the project you can run
cmake --build build-cmake --target clean

# If you need to regenerate the asset headers to check them into source
cmake --build build-cmake --target ExtractAssetHeaders

# If you need a newer soh.otr only
cmake --build build-cmake --target GenerateSohOtr
Generating a distributable
After compiling the project you can generate a distributable by running of the following:
# Go to build folder
cd build-cmake
# Generate
cpack
Switch
- Requires that your build machine is setup with the tools necessary for your platform above
- Requires that you have the switch build tools installed
- Clone the Ship of Harkinian repository
- Place one or more compatible roms in the
OTRExporterdirectory with namings of your choice
cd Shipwright
# Setup cmake project for your host machine
cmake -H. -Bbuild-cmake -GNinja
# Extract assets & generate OTR (run this anytime you need to regenerate OTR)
cmake --build build-cmake --target ExtractAssets
# Setup cmake project for building for Switch
cmake -H. -Bbuild-switch -GNinja -DCMAKE_TOOLCHAIN_FILE=/opt/devkitpro/cmake/Switch.cmake
# Build project and generate nro
cmake --build build-switch --target soh_nro

# Now you can run the executable in ./build-switch/soh/soh.nro
# To develop the project open the repository in VSCode (or your preferred editor)
Wii U
- Requires that your build machine is setup with the tools necessary for your platform above
- Requires that you have the Wii U build tools installed
- Clone the Ship of Harkinian repository
- Place one or more compatible roms in the
OTRExporterdirectory with namings of your choice
cd Shipwright
# Setup cmake project for your host machine
cmake -H. -Bbuild-cmake -GNinja
# Extract assets & generate OTR (run this anytime you need to regenerate OTR)
cmake --build build-cmake --target ExtractAssets
# Setup cmake project for building for Wii U
cmake -H. -Bbuild-wiiu -GNinja -DCMAKE_TOOLCHAIN_FILE=/opt/devkitpro/cmake/WiiU.cmake # -DCMAKE_BUILD_TYPE:STRING=Release (if you're packaging)
# Build project and generate rpx
cmake --build build-wiiu --target soh # --target soh_wuhb (for building .wuhb)

# Now you can run the executable in ./build-wiiu/soh/soh.rpx or the Wii U Homebrew Bundle in ./build-wiiu/soh/soh.wuhb
# To develop the project open the repository in VSCode (or your preferred editor)
Compatible Roms
Getting CI to work on your fork
The CI works via Github Actions where we mostly make use of machines hosted by Github; except for the very first step of the CI process called "Extract assets". This steps extracts assets from the game file and generates an "assets" folder in soh/.
To get this step working on your fork, you'll need to add a machine to your own repository as a self-hosted runner via "Settings > Actions > Runners" in your repository settings. Make sure to add the 'asset-builder' tag to your newly added runner to assign it to run this step. To setup your runner as a service read the docs here.
Runner on Windows
You'll have to enable the ability to run unsigned scripts through PowerShell. To do this, open Powershell as administrator and run set-executionpolicy remotesigned. Most dependencies get installed as part of the CI process. You will also need to separately install 7z and add it to the PATH so 7z can be run as a command. Chocolatey or other package managers can be used to install it easily.
Runner on UNIX systems
If you're on macOS or Linux take a look at macports-deps.txt or apt-deps.txt to see the dependencies expected to be on your machine.